Mathematics
Science
Grade Levels: 7th Grade, 8th Grade, 9th Grade, 10th Grade, 11th Grade, 12th Grade,
Topics: AlgebraFunctionsPatternsPhysical Science
Common Core State Standard: 6.EE.2c, 6.EE.6, 6.EE.7, 6.EE.9, 6.SP.3, 7.EE.4a, 8.EE.5, 8.SP.3, A-REI.10, S-ID.7,
Concepts:
Mathematics:
• Independent and dependent variables
• Slope
• Direct variation (optional)
Science:
• Inertia
• Center of Gravity
• Centripetal force
Mathematics:
• Can relate aspects of graphical model to features ofthe real world phenomenon that it represents
• Can determine the slope of a line and use that information to represent a direct variation in equation form.
Science:
• Knows that forces have magnitudes and directions.
• Understands the forces which operate on a vehicle moving on a curved path and the way they interact with the vehicle’s inertia
For each team:
• Two blocks of wood (as described in the handout)
• Two spring balances
Lesson:
Procedure:
Prepare the Futures Channel movie “Creating Cars” for presentation. Tell students that as they watch the movie, you want them to think about this question (which should be posted):
If you were designing a new car, what’s the first thing you would want to know about it? At the end of the movie, discuss answers to the question. Accept all student answers, and guide the discussion to the point of class agreement that it would be very important to know what the car is to be used for.
At this point, you may choose to distribute the handout to student teams and have them study it, or to present the information on the first three pages yourself. Either way, it is recommended that you conclude by assessing their understanding of the way the forces operate by asking them to explain, with diagrams, the relationship of the height of the center of gravity of a vehicle to the likelihood it will roll over in a turn. (Note: This context also presents an opportunity to introduce the term “centripetal force”—the force that operates to overcome an object’s inertia when it follows a curved path—and the fact that centripetal force is always directed towards the inside of a turn.)
Once students understand the interaction of the forces involved, have them do the demonstration (or you may choose to do it as a classroom activity).
Students should find that the amount of force required to lift the opposite side of the vehicle depends on the width of the vehicle—the greater the width, the more force required.
Graphing the data should yield points that lie roughly on a straight line which passes through the origin; students would determine the slope of the line to find the formula which describes the relationship:
Force required = (slope) × width of vehicle
In discussing the graphs, review the terms “function,” “independent variable” and “dependent variable” in the context of the activity. For more advanced students, you may wish to also review the meaning of the term “direct variation” and “inverse variation” (noting that the relationship between force required and height of center of gravity is an inverse variation).
Notes:
• One way to quickly make the long blocks of wood is to glue three 8-foot lengths of 2×2 lumber together (stacked three high), then cut them into 12 inch sections. Similarly, for the other blocks, you can glue six 8-foot lengths of 2 x 2 together (stacked three high and two wide) and cut them into 6 inch sections. (Do not nail them together; the nails will shift the position of the center of gravity.)
• You may wish to demonstrate one property of “center of gravity” by suspending the blocks from the screw eyes with a string and noting that they do not tilt to one side or another.
• You may find that lifting the wider blocks of wood off the table takes more force than can be measured by a single spring balance. In that case, use multiple spring balances in a parallel configuration (all hooked to a wire that is attached to the screw eye), and add their measurements.
• As you teach this lesson, help students avoid the misconception that there is a force acting to push the vehicle toward the outside of the turn (so-called “centrifugal” force). The reason the vehicle tends to move toward the outside of the turn is only its inertia; the forces that operate on the vehicle must be strong enough to overcome that inertia in order to keep the vehicle on the road. It may help to point out to students that the forces they actually experience when sitting in a vehicle, which is taking a turn, are forces that operate in the direction of the inside of the turn, whether friction from the seat, restraint of their seat belt, or pressure of the car door they are leaning against (if they are seated on the side of the car that is on the outside of the turn).
New Car Tips
The first thing a car designer has to decide is the type of vehicle being designed: a sports car, a family sedan, an SUV, or something else.
Sports cars are designed to accelerate quickly and go fast around curves. SUV’s are designed to have a large capacity and travel in rough terrain.
But why is it, exactly, that a sports car can make a turn at a speed that will cause an SUV to roll over?
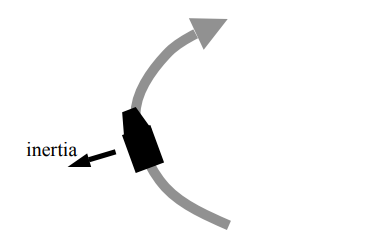
When any vehicle is turned, it has a tendency to resist that turn—to keep going in the direction that it was already going. This is called inertia. The inertia acts in a direction that is outward from the turn:
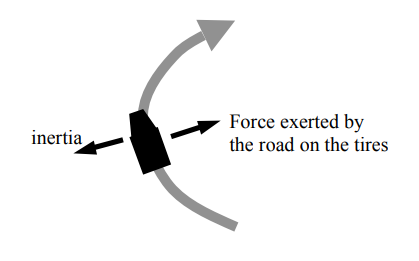
To counter the inertia, as the car turns the tires “grip” the road (that is, the force of friction operates to keep the tires from sliding). This means that the road exerts force to keep the tires—and the vehicle—from sliding toward the outside of the turn. This force acts toward the inside of the turn.
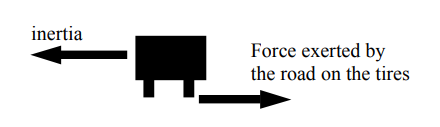
The faster the vehicle takes the curve, the greater is the inertial tendency to keep going in a straight line. So if the vehicle is going too fast, the inertia is too great and the vehicle will slide off the road:
All of the above is equally true for sports cars and SUV’s. But there is another factor that comes into play, which you can’t see if you look at the picture from overhead. Instead, look from behind the vehicle:
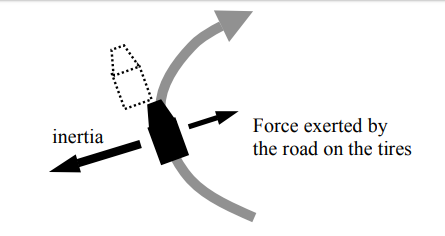
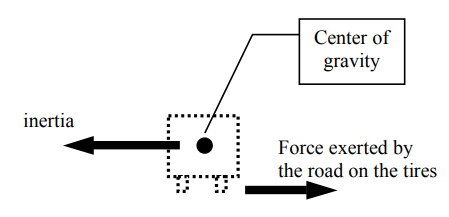
Here again we see the direction of inertia, and the opposite-acting force on the tires. But now we see that the force on the tires is acting where the tires meet the road, underneath the vehicle, but the inertia acts on the whole body of the vehicle—bottom, middle, and top.
When you add up the inertia effects on all of the parts of the vehicle, it’s as though all of the mass of the vehicle were concentrated in one location, called the “center of gravity.”
The position of the center of gravity depends on how the weight is distributed in the vehicle—the more weight is toward the bottom, the lower the center of gravity; the more weight toward the top, the higher the center of gravity. But it is always going to be somewhere above the tires.
You can see from the above view that even when the force exerted by the road exactly counters the inertia of the vehicle, the fact that they are operating at different points could cause the vehicle to tip over.
Here’s are front end views of a sports car and an SUV:
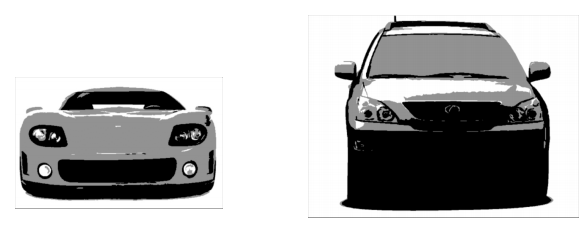
Which has a higher center of gravity?
Which do you think is more likely to roll over on a sharp turn?
If you said “SUV’s,” you’re right. Statistics from the National Highway Traffic Safety Administration show clearly that SUV’s are more likely to have rollover accidents than sports cars. (Note: This does NOT mean that sports cars are safer than SUV’s; in fact they are not, in general.)
But the height of the center of gravity isn’t the only thing that determines how likely a vehicle is to roll over. There’s another factor that is equally important. Do the demonstration described on the next three pages to find out what it is.
Demonstration
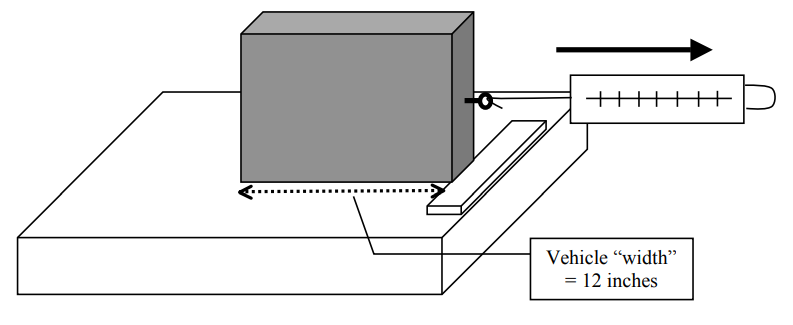
You will need two blocks of wood, both the same height but with different base dimensions. You will also need several spring balances.
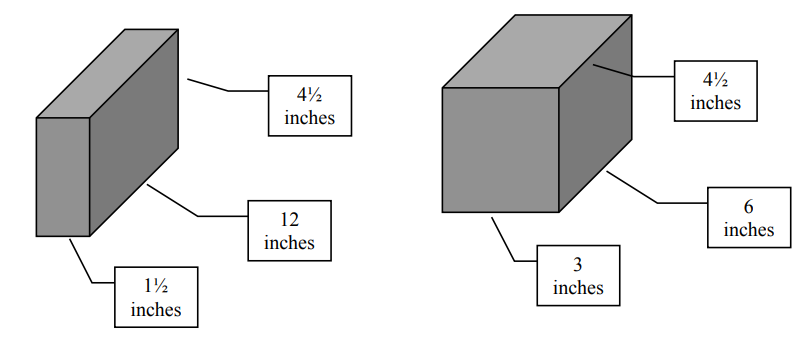
Compute the volumes of both blocks of wood. How do you think their weights will compare to each other? Explain: _____________________
_______________________________________________________
Attach screw eyes to the front and side of each block of wood, exactly in the centers:
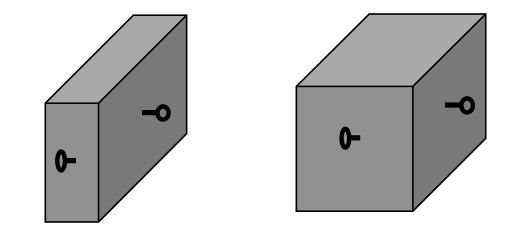
Choose one block of wood, and set it up on a table as shown below, using a ruler to keep the bottom from moving as you pull on the screw eye with the spring balance:
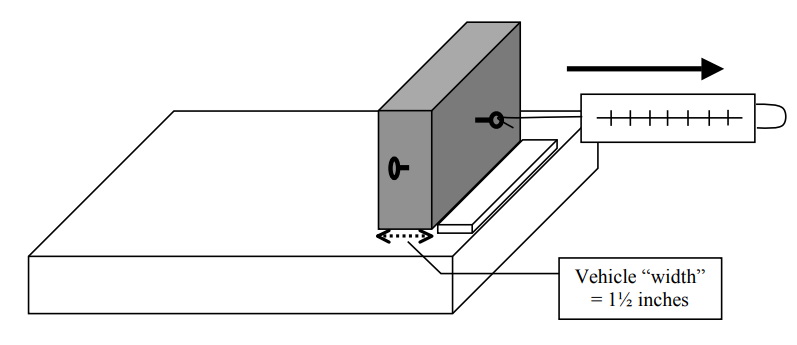
Measure the amount of force required to lift the opposite side of the block of wood just slightly off the table.
Now use the same block of wood, but the other screw eye:
Again, measure the amount of force required to lift the opposite side of the block of wood just slightly off the table.
Repeat these measurements with the other block of wood.
1. Organize your data in a table. What do you think causes the amounts of force in each case to be different? __________________________
_____________________________________________________
_____________________________________________________
2. Can you relate the variable of “amount of force” required to another variable in this demonstration? Explain: _______________________
_____________________________________________________
_____________________________________________________
3. Show the relationship of these two variables in a graph (the amount of force would be the dependent variable on the “y” axis, the variable that it depends on—the independent variable—would be on the “x” axis).
4. Can you find a formula that expresses the relationship between the two variables fairly accurately? ________________________________
_____________________________________________________
5. How would you apply what you have learned to choose a car that has a low likelihood of roll-over on a sharp turn? ________________________
_____________________________________________________
_____________________________________________________
_____________________________________________________