Mathematics
Science
Grade Levels: 5th Grade, 6th Grade, 7th Grade, 8th Grade,
Topics: The Nature of Science and TechnologyExperimentationPhysicsGeometry (Circles)Statistics
Concepts:
Mathematics:
· Radius
· Diameter
Knowledge and Skills:
Mathematics:
· Can represent and interpret numerical data in chart and graph form
Science:
· Can present experimental results clearly in written form.
· Is familiar with the “simple machines” and knows that they can reduce the amount of effort necessary to move or lift something.
· A bicycle (for the do now*)
· An antigravity machine for each team (see instructions)
· One spring balance for each team
· One set of calipers for each team (or a “crescent” wrench)
· One “Antigravity Machine” chart for each student
Lesson:
Procedure:
Do Now: “Look carefully at the bicycle at the front of the classroom. Write an exact description of it.”
Have students carry out the “do-now”. Give them 5 minutes to do so.
When all students have written several observations, ask them to share their observations. They should notice several geometric elements—lines, angles, triangles and, of course, circles.
*Do Now: A short warm-up activity that students can do on their own at the beginning of class. “Do now” instructions are usually written on the blackboard before class begins so that students can do the activity immediately and without further direction.
Lead discussion to a review of the characteristics of circles and the terms “radius”, “diameter, “chord”, “arc”, and “circumference”. Ask students if they can think of any other machines, and whether or not circles are used in them. In this discussion, make sure that students understand the definition of machine: a device or object that makes work easier.
Ask students what they think an “antigravity machine” would do (“something that helps you work against gravity”). Tell them that you are going to show them an antigravity machine for the day’s activity. Arrange the class into teams of three, and give each team an antigravity machine.
Explain to students that they are to measure how hard it is to lift the weight using cylinders with different diameters.
Tell students they will need to measure the diameter of each of the cylinders.
Demonstrate how to do this with calipers (or the crescent wrench) by setting the jaws so that they just fit over the cylinders, then measuring the distance between them.
Explain how the chart is to be filled out, and have them start.
Circulate as students do the activity and assist or facilitate as needed.
Once a team has completed its three measurements, have that team compare their results with another team, and resolve any major differences in data.
When all teams are finished, ask students to share their observations.
The Antigravity Machine
Materials:
- A shoebox, approximately 6 inches wide and at least 3 inches deep.
- Round pencil with diameter such that it will fit through the hub of the spools.
- Large and small spools of thread
- Masking tape
- Glue
- String
- Empty penny roll, cut in half across the width
- 25 pennies
 Make a weight by putting the pennies into the penny roll, taping one end shut and taping a paper clip handle onto the other end. (NOTE: You may need to adjust the number of pennies in the weight so that the amount of force needed registers on the spring balance scale in all three cases. Once you have built the machine, test it and use an appropriate number of pennies in the weight.)
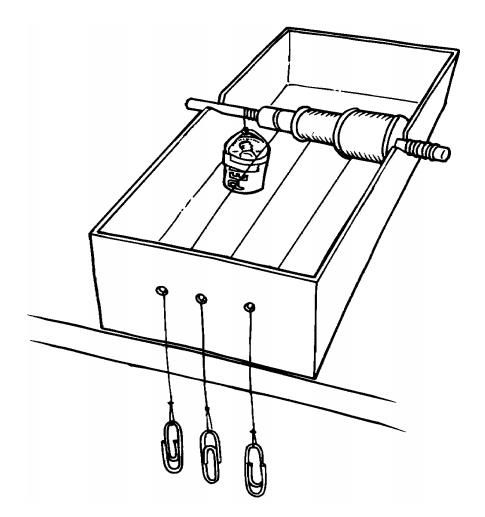
Cut two notches in the sides of the shoebox, approximately ½” deep and 1” wide.
Glue the spools onto the pencil toward the eraser end, leaving one inch free on that end.
The spools should both have their thread wound in the same direction.
Next to the smaller spool, wrap masking tape around the pencil so as to form a cylinder of about half the diameter of the smaller spool. Wrap a string around this in the same direction as the thread on the spools.
Next to the masking tape, wrap a string around the pencil in the opposite direction to that of the thread. Leave three inches free, and tie the end of that string to the weight.
Set the pencil into the notches on the shoebox and run the two threads and free string out through punched holes in the end of the shoebox. Tie the ends of these strings to paper clips, as shown.
Note: As an alternative to the spools, you can wrap varying amounts of masking tape around the pencil to form three cylinders of different size, and then wrap string around those cylinders. The cylinders formed should have diameters of roughly ¾ inches, 1½ inches, and 2¼ inches.
Antigravity Experiment
Students’ names: ____________________________________________ Date: _____________
Data
| Diameter | How hard to lift | |
| Smallest | ||
| Middle | ||
| Largest |
Conclusions
______________________________________________________________________________________________________________________________________________________________________________________________________________________________________________________________________________________________________________________________________________________________________________________________________________________________________________________________________________